Description
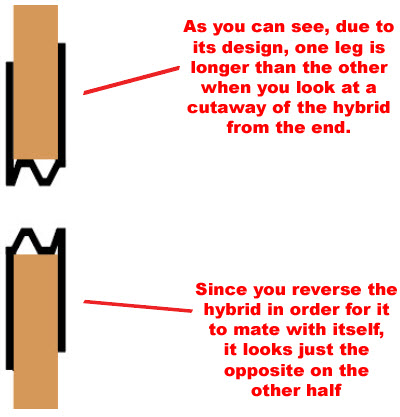
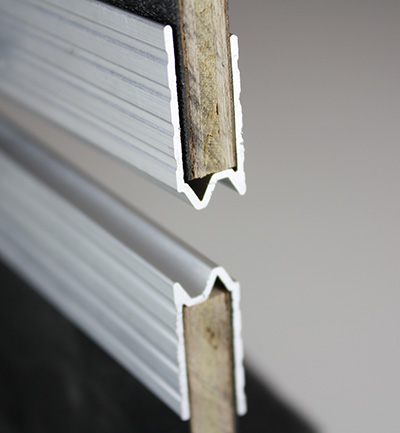
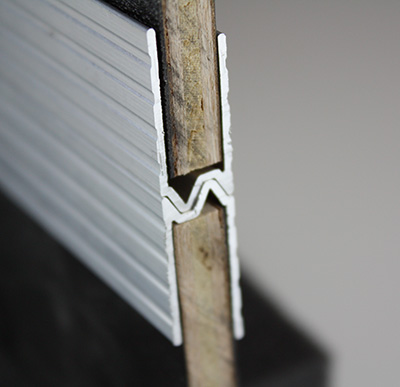
Hybrid Tongue & Groove Extrusion - Mates with itself. Operates on a “mirror image” concept, almost like two W’s coming together when the lid closes. This not only provides for a much tighter lid closure, but is also a great benefit if you should make a bad cut. This way you don’t end up running short of either the separate tongue or groove. One Hybrid extrusion plays the part of two traditional separate tongue & groove sections. Also see our calculation example below in determining the amount you'll need for your project (numbers are rounded for ease of understanding). If you have any questions regarding how this functions after taking a look at it, please refer to the FlexiCase Design Tool documents entitled "Hybrid Tongue & Groove Explained" and "Standard Split-Dish Twist Latch Cutout", or contact us, or see our video tutorial on hybrids.
NOTE: Mill finish unanodized extrusions can commonly incur surface abrasions during shipment from rubbing together if they incur harsh handling during the shipment process. This is not abnormal, and is easy to remedy by rubbing the extrusions with some #0000 Fine Grade Steel Wool, cheaply available at any hardware store.
ALWAYS do a test fit with your sticks to familiarize yourself with how they mate before cutting.

NOTE: Even though the legs are a different length when you look at the cutaway, once the lid is closed, the design provides for an equal dimension of exposed extrusion on either side of the closure seam.

Having difficulty determining how much Hybrid T & G you need? The formula is easy and as follows:
Determine the total perimeter distance (circumference) of your case opening by adding up the length of each 4 sides that make up the case opening and multiply by 2
Example: If you have a trunk style case that is 40" side to side and 20" front to back, your formula would be: 40+40+20+20 = 120 x 2 = 240
So, 240" (which is 20 ft., which is 3 sticks) minimum amount of of Hybrid T & G required. But as we always recommend, it's always a good idea to purchase a little more than needed for unforeseen errors. Better to have that extra stick than to run short in the middle of our project, or if you make a bad cut.
Rivets Required For Installation: Varies depending on length of section used, as well as associated parts that may be riveted through it.
Depending on your case design some rivets may require backing washers. Most rivets will install through the interior leg of the extrusion and therefore require no backing washers.
RECOMMENDED USES:
All Cases utilizing 3/8" wall panels.
MINIMUM RECOMMENDED CASE DIMENSIONS:
Typically, cases 250 pounds or less and, or, with an overal dimension of 150 inches or less (width + depth + height)
EXAMPLES
- All Cases
ASSOCIATED COMPATIBLE PARTS:
- All Of Our Corner Braces.
- Mates with itself
Material: Mill Finished Aluminum
Additional Information
Specifications Drawings: |
See Parts Pictures Above |
Mates With: |
Itself |
4 Reviews
-
Size
Excellent quality material and price, my go to for all my 3/8 wall projects.
-
Road case with nice tirm
This was exactly as described. First time with DIY Road Case and the price for this was verey good. I will be back!!!
-
Hybrid tongue & groove
Great product. Only issue I have is sizing. It would be nice if the plywood manufacturers and extrusion folks got together and matched dimensions. Far as I can tell, no such thing as actual 1/4", 3/8" or 1/2" cabinet grade plywood. However, extrusions are made to true measurements. Great if you intend putting a veneer over the wood but sloppy fit if finished natural. ::::::::::::::::::::: DIY Road Cases® Response ::::::::::::::::::::::::::::: Hi , I am sorry to hear that you experienced some issues. Unfortunately, there are factors that can play a part in improper fit into the extrusion channels. First, let me say that our extrusion channels are actually milled slight;y larger than the actual 1/4", 3/8" & 1/2" wall thicknesses to allow for our exterior laminates. Next, as mentioned on our sites, wood thicknesses at outlets such as Lowe's and Home Depot can actually be slightly off from true 3/8" & 1/2" thickness. 1/4" is usually labeled as such. However, 3/8" may be seen as 11/32" or 9mm, and 1/2" may be seen as 15/32" or 12mm. Regardless, we always recommend that you take a tape measure with you to be sure of the thickness. This should eliminate any such fit problems. Also keep in mind that wood swells in humid conditions, or if it gets wet, or if it has gotten wet and dried. Also, if you plan to use the wood without a laminate (and just want to paint, or stain, the wood), and the fit is a bit too loose for your taste, then you can simply shim up the inner side of the extrusion and wood fitting - problem solved. Best wishes, Jonathan Beacon Director of Sales & Merchandising DIY Road Cases®
-
Best lid closure solution!
The hybrid tongue and groove is soooooo much more awesome than the old style tongue and groove. The other thing that I like about DIY cases is that they offer it in all 3 channel widths (1/4", 3/8" & 1/2") unlike one of the other companies that only has it in 1/4". The fit is so much tighter and this stuff is so much easier to work with. With the other stuff if I made an incorrect cut on either the tongue or the groove then I was screwed and had to order more cuz the amounts no longer matched up. Now if I make a bad cut I just cut a new piece from whats letf cuz this extrusion mates with itself . . brilliant!


